Duck DNS
free dynamic DNS hosted on AWS
news: faster UDP under load, and cleaner addresses
support us: become a Patreon
linux cron
if your linux install is running a crontab, then you can use a cron job to keep updatedwe can see this with
ps -ef | grep cr[o]nif this returns nothing - then go and read up how to install cron for your distribution of linux.
also confirm that you have curl installed, test this by attempting to run curl
curlif this returns a command not found like error - then find out how to install curl for your distribution. otherwise lets get started and make a directory to put your files in, move into it and make our main script
mkdir duckdns
cd duckdns
vi duck.sh
now copy this text and put it into the file (in vi you hit the i key to insert, ESC then u to undo) you must change your token and domain to be the one you want to update
you can pass a comma separated (no spaces) list of domains
you can if you need to hard code an IP (best not to - leave it blank and we detect your remote ip)
hit ESC then use use arrow keys to move the cursor x deletes, i puts you back into insert mode
echo url="https://www.duckdns.org/update?domains=exampledomain&token=a7c4d0ad-114e-40ef-ba1d-d217904a50f2&ip=" | curl -k -o ~/duckdns/duck.log -K -now save the file (in vi hit ESC then :wq! then ENTER)
this script will make a https request and log the output in the file duck.log
now make the duck.sh file executeable
chmod 700 duck.shnext we will be using the cron process to make the script get run every 5 minutes
crontab -ecopy this text and paste it at the bottom of the crontab
*/5 * * * * ~/duckdns/duck.sh >/dev/null 2>&1now save the file (CTRL+o then CTRL+x)
lets test the script
./duck.shthis should simply return to a prompt
we can also see if the last attempt was successful (OK or bad KO)
cat duck.logif it is KO check your Token and Domain are correct in the duck.sh script
linux GUI
the linux GUI version requires zenity, curl & cron to be installed.install zenity, curl & cron if it is not installed already.
on debian based linux systems open a terminal and enter
sudo apt-get install zenity cron curldownload the linux GUI version to your users home folder
to run the script open a terminal window and enter:
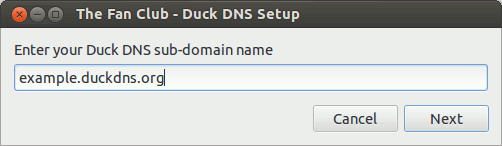
chmod +x duck-setup-gui.sh
./duck-setup-gui.sh
enter your domain
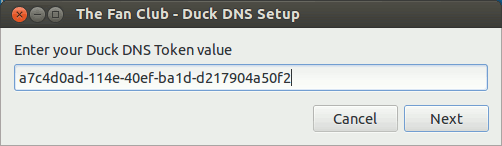
enter your token
There will now be a log file and shell script (which you can test manually) installed at something like
~/duckdns/duck.log
~/duckdns/duck.sh
The shell script will have been added to a cron that is called every 5 minutes as your user, you can view this with
crontab -l
DotNet Core Script
the DotNew Core Script should work on any system that can run DotNet: Windows, OSX, Linux systemsthe Project includes a full set of instructions linux Shell version
windows gui
this is an Open Source tray based service that was created by Joe Jaro.you can either use the EXE to install the software and it will deal with starting on login, or you can use the JAR file directly, but you will have to make it start-up when you want it to be running .
Step 1 - download & install the software from www.etx.ca
download the software from http://www.etx.ca/install the client and start it, you should see a new Tray Icon appear (in Windows 7 you may need to make it always visible, by right clicking on your tray and changing the settings)

Step 2 - configure the software for your chosen domain
right click on the tray and choose DuckDNS Settings you should now see the settings screenon this screen you must change your token and domain to be the one you want to update
then click OK to apply the new settings

Step 3 - check it works
you should now see the new tray icon, when you hover the mouse over it you will see some details of its current status.windows script
these instructions are for Windows 7, the vbs script should work in Vista, Windows 8 and even XPhowever you will have to work out the differences in the Task Scheduler between different versions of Windows.
Step 1 - Choose your Domain
you must change your token and domain to be the one you want to updateStep 2 - Creating the script
2.1 Go to 'Start' and select Computer (Windows XP select My Computer)2.2 Go into C:\users\YOUR-USERNAME (Windows XP: C:\Documents and Settings\YOUR-USERNAME)
2.3 Right click in an empty spot and go to NEW > Text Document. Name the file Duckdns and open the file.
2.4 Highlight all of the green text below and RIGHT CLICK > COPY
Call LogEntry()

Sub LogEntry()
	On Error Resume Next
	Dim objRequest
	Dim URL

	URL = "https://www.duckdns.org/update?domains=exampledomain&token=a7c4d0ad-114e-40ef-ba1d-d217904a50f2&ip="

	Set objRequest = CreateObject("Microsoft.XMLHTTP")
	objRequest.open "GET", URL , false
	objRequest.Send
	Set objRequest = Nothing
End Sub
2.5 Go back to the text document and select Paste. Save the document and close it.2.6 Replace the .TXT at the end of the text document file with .VBS and press enter. Select Yes to the extension popup.
NOTE: If you can't see the .TXT at the end of the file you will need to turn on 'File Name Extensions'. This can be done by:
Windows 8: Open an explorer window such as Computer or Documents folder by pressing CTRL + E keyâs on your keyboard. Along the top bar there is an option called VIEW, select it and to the right hand side place a tick in the box that reads "File Name Extensions". Go back to your file and perform step 2.6.
Windows 7 / XP: Go to Start and select Computer (My Computer for XP) then along the top of the window find and select Tools > Folder Options and go to the View tab. Find and de-select the "Hide extensions for known file types". Click OK, go back to your file and perform step 2.6.
Step 3 - Creating a Task
This task is to automatically run the script file you have just created. Please follow the instructions based on your edition of Windows.Windows 7 and 8: To open Task Scheduler on Windows 8 and 8.1: Click on the Start menu (Windows 8.1) or press your Windows key on your keyboard. Start typing the words CONTROL PANEL and select Control Panel from the right hand side when the option appears. Go in to Administrative Tools and open Task Scheduler.
To open Task Scheduler on Windows 7: Click Start and select Control Panel. Go in to Administrative Tools and open Task Scheduler.
Select Create Task from the right column. Enter "DuckDns Updater" in the Name field then select the Triggers tab and click New.
Set the Trigger to be Daily, starting at 12:00:01AM and tick the box to 'Repeat task every:' and set it to 5 minutes. (Refer to image below). Click OK when done.

Next go to the Actions tab and select New. In the ']Program/script' field select the Browse button. In the new window that opened, click on âThis PCâ on the left column and then go to C:\Users\YOUR-USERNAME and click once on the script you created before. Click OPEN on the bottom of the window then click OK and OK again on the Create Task window.

Windows XP:
Click Start, go to Control Panel and open 'Schedule Tasks'. Select Add a new Task from the top of the window.
Click Next on the new window that opens then select Browse when presented with the window shown below.

Click on My Computer on the left column and go to C:\Documents and Settings\YOUR-USERNAME
Click once on your script file and select Open from the bottom right.

On the next window select 'When I Log On' and click Next. Leave the username and password boxes as they are and select Next, then Select Finish.
windows powershell
these scripts are for Windows PowershellStep 1 - Choose a Script
Tested in Windows 8 - Powershell 4 - script by - Bryan Childshttps://github.com/godeater/Enable-DuckDns
or
Tested in Windows Vista - Powershell 2 - script by - Adam Taylorhttps://github.com/ataylor32/duckdns-powershell
osx
if you are not familiar with using the terminal on OSX consider using the JAR file (from the windows-gui) from http://www.etx.ca/osx (10.8 or older) by default does have cron installed,
when you open the crontab, a new crontab will be setup for your user
lets get started and make a directory to put your files in, move into it and make our main script
these instructions are for the user administrator change the paths to match your user
open a new terminal, it will be in your home directory
mkdir duckdns
cd duckdns
vi duck.sh
now copy this text and put it into the file (in vi you hit the i key to insert, ESC then u to undo) you must change your token and domain to be the one you want to update
you can pass a comma separated (no spaces) list of domains
you can if you need to hard code an IP (best not to - leave it blank and we detect your remote ip)
hit ESC then use use arrow keys to move the cursor x deletes, i puts you back into insert mode
echo url="https://www.duckdns.org/update?domains=exampledomain&token=a7c4d0ad-114e-40ef-ba1d-d217904a50f2&ip=" | curl -k -o /Users/administrator/duckdns/duck.log -K -now save the file (in vi hit ESC then :wq! then ENTER)
this script will make a https request and log the output in the file duck.log
now make the duck.sh file executeable
chmod 700 duck.shnext we will be using the cron process to make the script get run every 5 minutes
crontab -ecopy this text and paste it at the bottom of the crontab
*/5 * * * * /Users/administrator/duckdns/duck.sh >/dev/null 2>&1now save the file (CTRL+o then CTRL+x)
lets test the script
./duck.shthis should simply return to a prompt
we can also see if the last attempt was successful (OK or bad KO)
cat duck.logif it is KO check your Token and Domain are correct in the duck.sh script
osx homebrew
open a new terminal, it will be in your home directorybrew tap jzelinskie/duckdns brew install duckdns ln -sfv /usr/local/opt/duckdns/*.plist ~/Library/LaunchAgents launchctl load ~/Library/LaunchAgents/homebrew.mxcl.duckdns.plistcreate a new text file at
$HOME/.duckdnsyou must change your token and domain to be the one you want to update
paste these contents into the file
DOMAIN="exampledomain"
TOKEN="a7c4d0ad-114e-40ef-ba1d-d217904a50f2"
IP Monitor for OS X
IP Monitor is an easy to use dynamic DNS update client for OS X.It supports DuckDNS and other dynamic DNS providers.
IP Monitor v2.0 update introduced IPv6 support.
IP Monitor is available from Apple Mac App Store around the world.


RealDNS for iOS and OSX
RealDNS is a client for iOS andthey support DuckDNS, have a look on the iTunes Store

raspberrypi
if you are running http://www.raspbmc.com/ then you must follow the raspbmc instructionsfirst lets login to your raspberrypi over ssh
ssh pi@raspberrypithen lets make a directory to put your files in, move into it and make our main script
mkdir duckdns
cd duckdns
vi duck.sh
now copy this text and put it into the file (in vi you hit the i key to insert, ESC then u to undo) you must change your token and domain to be the one you want to update
you can pass a comma separated (no spaces) list of domains
you can if you need to hard code an IP (best not to - leave it blank and we detect your remote ip)
hit ESC then use use arrow keys to move the cursor x deletes, i puts you back into insert mode
echo url="https://www.duckdns.org/update?domains=exampledomain&token=a7c4d0ad-114e-40ef-ba1d-d217904a50f2&ip=" | curl -k -o ~/duckdns/duck.log -K -now save the file (in vi hit ESC then :wq! then ENTER)
this script will make a https request and log the output in the file duck.log
now make the duck.sh file executeable
chmod 700 duck.shnext we wil be using the cron process to make the script get run every 5 minutes
crontab -ecopy this text and paste it at the bottom of the crontab
*/5 * * * * ~/duckdns/duck.sh >/dev/null 2>&1now save the file (CTRL+o then CTRL+x)
lets test the script
./duck.shthis should simply return to a prompt
we can also see if the last attempt was successful (OK or bad KO)
cat duck.logif it is KO check your Token and Domain are correct in the duck.sh script
The final task for Raspbmc is to make the cron autostart on reboot for Raspbian you don't need to do this
first we simply manualy start the crontab
sudo service cron startThen to automatically start cron on reboot, in Raspmbc you check the option in the Programs Raspbmc menu in XBMC
raspbmc - raspberrypi
if you are using the XMBC build for raspberrypi (http://www.raspbmc.com/) then you need additional changesthe Raspbmc has a slightly more hardened SSH server, this would prevent you from SSHing onto your pi from the internet.
the changes below will allow you to connect via SSH from an external network
before we modify the access, we must change the password for user pi
ssh pi@192.168.1.160
(password is raspberry)
passwd
(password is raspberry)
smbpasswd
good, ok the next change is to adjust the iptables config these are the rules preventing access for port 22
sudo su
vi /etc/network/if-up.d/secure-rmc
now move to the botom of the file (SHIFT + G) and change the 2 lines to look like the 4 lines below
(in vi you hit the i key to insert, ESC then u to undo)
iptables -A INPUT -s $NETMASK -i $IFACE -j ACCEPT
iptables -A INPUT -p tcp --dport 22 -i $IFACE -j ACCEPT
iptables -A INPUT -p udp --dport 22 -i $IFACE -j ACCEPT
iptables -A INPUT -i $IFACE -j DROP
last 2 jobs - install curl and reboot your pi
sudo apt-get update
sudo apt-get install curl
sudo reboot now
lets make a directory to put your files in, move into it and make our main script
cd ~
mkdir duckdns
cd duckdns
vi duck.sh
now copy this text and put it into the file (in vi you hit the i key to insert, ESC then u to undo) you must change your token and domain to be the one you want to update
you can pass a comma separated (no spaces) list of domains
you can if you need to hard code an IP (best not to - leave it blank and we detect your remote ip)
hit ESC then use use arrow keys to move the cursor x deletes, i puts you back into insert mode
echo url="https://www.duckdns.org/update?domains=exampledomain&token=a7c4d0ad-114e-40ef-ba1d-d217904a50f2&ip=" | curl -k -o ~/duckdns/duck.log -K -now save the file (in vi hit ESC then :wq! then ENTER)
this script will make a https request and log the output in the file duck.log
now make the duck.sh file executeable
chmod 700 duck.shnext we will be using the cron process to make the script get run every 5 minutes
crontab -ecopy this text and paste it at the bottom of the crontab
*/5 * * * * ~/duckdns/duck.sh >/dev/null 2>&1now save the file (CTRL+o then CTRL+x)
lets test the script
./duck.shthis should simply return to a prompt
we can also see if the last attempt was successful (OK or bad KO)
cat duck.logif it is KO check your Token and Domain are correct in the duck.sh script
The final task for Raspbmc is to make the cron autostart on reboot for Raspbian you don't need to do this
first we simply manually start the crontab
sudo service cron startThen to automatically start cron on reboot, in Raspmbc you check the option in the Programs Raspbmc menu in XBMC
ec2 (linux)
on ec2 the current ip can be found using the command ec2-metadata --public-ipv4this means that we only need to update your record when it does change
because ec2 instances get assigned an ip on boot we need to force the ip in the curl command so first lets login to your ubuntu ec2 instance over ssh as ubuntu user
ssh -i <YOUR PEM KEY> user@ec2-00-00-00-00.us-west-2.compute.amazonaws.comthen lets make a directory to put your files in, move into it and make our main script
mkdir duckdns
cd duckdns
vi duck.sh
now copy this text and put it into the file (in vi you hit the i key to insert, ESC then u to undo) you must change your token and domain to be the one you want to update
you can pass a comma separated (no spaces) list of domains
hit ESC then use use arrow keys to move the cursor x deletes, i puts you back into insert mode
#!/bin/bash
current=""
while true; do
	latest=`ec2-metadata --public-ipv4`
	echo "public-ipv4=$latest"
	if [ "$current" == "$latest" ]
	then
		echo "ip not changed"
	else
		echo "ip has changed - updating"
		current=$latest
		echo url="https://www.duckdns.org/update?domains=exampledomain&token=a7c4d0ad-114e-40ef-ba1d-d217904a50f2&ip=" | curl -k -o ~/duckdns/duck.log -K -
	fi
	sleep 5m
done
now save the file (in vi hit ESC then :wq! then ENTER)
now make the duck.sh file executeable and then create the next script file
chmod 700 duck.sh
vi duck_daemon.sh
now copy this text and put it into the file (in vi you hit the i key to insert, ESC then u to undo)
#!/bin/bash
su - ubuntu -c "nohup ~/duckdns/duck.sh > ~/duckdns/duck.log 2>&1&"
now save the file (in vi hit ESC then :wq! then ENTER)
now make the duck_daemon.sh file executeable and change its permissions
chmod +x duck_daemon.sh
sudo chown root duck_daemon.sh
sudo chmod 744 duck_daemon.sh
to test this we must run it as root
sudo ./duck_daemon.shthis should simply return to a prompt
we can see it is running with
ps -ef | grep duckwe can also see if the last attempt was successful (OK or bad KO)
cat duck.logif it is KO check your Token and Domain is correct in the duck.sh script
finally we make the duck daemon auto start on boot up
sudo ln -s ~/duckdns/duck_daemon.sh /etc/rc2.d/S10duckdnsas you can see the script is all set to start as the instance boots
ls -la /etc/rc2.d/the final test is to kill the process running and start it as the bootup would
pkill duck
sudo /etc/rc2.d/S10duckdns
we can now see if its running
ps -ef | grep duck
OpenWrt
the first part of the instructions are for people who want an easier install, but will accept httpif you want to use https, then you need to follow the further instructions
the wiki at http://wiki.openwrt.org/doc/howto/ddns.client may be helpful if you have issues
you must change your token and domain to be the one you want to update
we install the ddns packages
opkg update
opkg install ddns-scripts
then setup the ddns-scripts
ddns-scriptsedit the config at /etc/config/ddns
config service "duckdns"
        option enabled          "1"
        option domain           "exampledomain.duckdns.org"
        option username         "exampledomain"
        option password         "a7c4d0ad-114e-40ef-ba1d-d217904a50f2"
        option ip_source        "network"
        option ip_network       "wan"
        option force_interval   "72"
        option force_unit       "hours"
        option check_interval   "10"
        option check_unit       "minutes"
        #option ip_source       "interface"
        #option ip_interface    "eth0.1"
        #option ip_source       "web"
        #option ip_url          "http://ipv4.wtfismyip.com/text"
        option update_url       "http://www.duckdns.org/update?domains=[USERNAME]&token=[PASSWORD]&ip=[IP]"
        #option use_https       "1"
        #option cacert          "/etc/ssl/certs/cacert.pem"
now start it up
sh
. /usr/lib/ddns/dynamic_dns_functions.sh # note the leading period
start_daemon_for_all_ddns_sections "wan"
exit
we can now test the script by running the command
/usr/lib/ddns/dynamic_dns_updater.sh duckdnsif you want to use https - you will need to download Start SSL's ca bundle and install it
first we install curl and download the PEM file
opkg update
opkg install curl
mkdir -p /etc/ssl/certs
curl -k https://certs.secureserver.net/repository/sf_bundle-g2.crt >  /etc/ssl/certs/ca-bundle.pem
then you need to re-alter the config at /etc/config/ddns (uncomment these 2 lines)
        option use_https       "1"
        option cacert          "/etc/ssl/certs/ca-bundle.pem"
refer to the wiki on debugging etc http://wiki.openwrt.org/doc/howto/ddns.client
tomatoUSB
these instructions are for tomatoUSBlog into the webpanel and visit the Basic then DDNS section
complete the Dynamic DNS 2 section with the URL
you must change your token and domain to be the one you want to update
https://www.duckdns.org/update?domains=exampledomain&token=a7c4d0ad-114e-40ef-ba1d-d217904a50f2You can have either HTTP or HTTPS as your choosen protocol

mikrotik
recent forum posts https://forum.mikrotik.com/viewtopic.php?f=9&t=84140#these instructions are for mikrotik routers
you must change your token and domain to be the one you want to update
Newer update to the script
:global actualIP value=[/ip address get [find where interface=MATRIX] value-name=address];
:global actualIP value=[:pick $actualIP -1 [:find $actualIP "/" -1] ];
:if ([:len [/file find where name=ipstore.txt]] < 1 ) do={
 /file print file=ipstore.txt where name=ipstore.txt;
 /delay delay-time=2;
 /file set ipstore.txt contents="0.0.0.0";
};
:global previousIP value=[/file get [find where name=ipstore.txt ] value-name=contents];
:if ($previousIP != $actualIP) do={
 :log info message=("Try to Update DuckDNS with actual IP ".$actualIP." -  Previous IP are ".$previousIP);
 /tool fetch mode=https keep-result=yes dst-path=duckdns-result.txt address=[:resolve www.duckdns.org] port=443 host=www.duckdns.org src-path=("/update?domains=exampledomain&token=a7c4d0ad-114e-40ef-ba1d-d217904a50f2&ip=".$actualIP);
 /delay delay-time=5;
 :global lastChange value=[/file get [find where name=duckdns-result.txt ] value-name=contents];
 :global previousIP value=$actualIP;
 /file set ipstore.txt contents=$actualIP;
 :if ($lastChange = "OK") do={:log warning message=("DuckDNS update successfull with IP ".$actualIP);};
 :if ($lastChange = "KO") do={:log error message=("Fail to update DuckDNS with new IP ".$actualIP);};
};
Older version of the script
:global currentIP;
:local newIP [/ip address get [find interface="INTERFACENAMEHERE"] address];
:if ($newIP != $currentIP) do={
    :log info "IP address $currentIP changed to $newIP";
    :set currentIP $newIP;
    /tool fetch mode=https url="https://www.duckdns.org/update?domains=exampledomain&token=a7c4d0ad-114e-40ef-ba1d-d217904a50f2&ip=$newIP" dst-path=duckdns.txt;
    :local result [/file get duckdns.txt contents];
    :log info "Duck DNS update result: $result";
}
add permissions for: read, write, policy, testdon't forget to change interface name, domains and token according to your configuration!
don't forget to set scheduler!
don't forget to enable IP Cloud (if you can't enable IP Cloud or are using an earlier version than RouterOS v6.14, use "newIP [/ip address get [find interface="ether1-gateway"];" instead of "newIP [/ip cloud get public-address];" in your script.
fritzbox
these instructions are for fritzbox routeryou must change your token and domain to be the one you want to update
some firmwares (Fritz!Box 7170) don't support HTTPS and do not like the &ip=<ipaddr> part of the URL - use the alternative URL if the HTTPS one does not work
on the web frontend of your fritzbox go to the page where you setup dyndns services and select custom service.
enter the following update Url
https://www.duckdns.org/update?domains=exampledomain&token=a7c4d0ad-114e-40ef-ba1d-d217904a50f2&ip=<ipaddr>&ipv6=<ip6addr>the domain is your subdomain on DuckDNS.
the password is your token.
the username should be set to "none".
use this alternative url (confirmed to work on Fritz!Box 7170) if your IP does not auto update
http://www.duckdns.org/update?domains=exampledomain&token=a7c4d0ad-114e-40ef-ba1d-d217904a50f2&ip=
zte h108n
these instructions are for the zte h108n routeryou must change your token and domain to be the one you want to update
the zteh108n has a DDNS panel in the Applications section of the web interface.
the actual DDNS scheme it uses is not supported by us, however we can use it to make plain http(s) requests.
you must add the ? at the end of the URL so that the extra text that is added by the router is ignored.
use the following URL (the pattern https://duckdns.org/update/exampledomain/yourtoken?)
you can add an additional ipaddress if you want to force a value (https://duckdns.org/update/exampledomain/yourtoken/ipaddress?)
Enable : Checked
Service Name : dyndns
Custom Server : www.duckdns.org
Custom URL : /update/exampledomain/a7c4d0ad-114e-40ef-ba1d-d217904a50f2?
Hostname : exampledomain
Provider : NA
Password : NA
here is what the section looks like in the web interface (make sure you follow the steps above)

freenas
there is a good online guide at : https://forums.freenas.org/index.php?threads/how-to-install-duckdns-org-a-how-to-guide.24170/these instructions are for any installation of freenas
you must change your token and domain to be the one you want to update
Login to your Freenas server GUI
Go to System->Cron Jobs->Add New Cron Job
Set up the new cron job.
Set it run as 'nobody'
You can have it at 1 minute past the hour, every 12 hours (or less), every day of the week.
The command to run is
/usr/local/bin/curl http://www.duckdns.org/update/exampledomain/a7c4d0ad-114e-40ef-ba1d-d217904a50f2
hardware
If you fancy making an Arduino solution based on the ESP8266 core, then best of luck someone has done this!Davide Gironi has created a Hardware board with custom firmware to use DuckdDns and provide a web interface
The instructions are covered in detail on his blog
you must change your token and domain to be the one you want to update
The configuration you will need is
domain : exampledomain
token : a7c4d0ad-114e-40ef-ba1d-d217904a50f2
android
these instructions are for people wanting to use an Android based OS to keep their duckdns record up-to dateyou could simply have an old android device - connected to your home network keeping your DuckDNS record up-to date, or you may run some service on your android device on a mobile network and want to reach it by a duckdns domain.
the client is provided by http://www.etx.ca/ and is download-able from the Play Market as you would expect.

pfSense
these instructions are for pfSense open source firewallon the web frontend of pfSense go to the page where you setup dyndns services and select custom service.
enter the following Update Url
https://www.duckdns.org/update?domains=exampledomain&token=a7c4d0ad-114e-40ef-ba1d-d217904a50f2&ip=%IP%change the Result Match to
OKthe username can be empty
the password can be empty

GnuDIP.http
these instructions are for GnuDIP.httpmany provided ADSL routers have this protocol as an option, such as the Huawei HG533.
on the web frontend of the router (usually http://192.168.1.1 with username and password - admin) go to the Advanced Settings and select DDNS.
now complete the configuration form and submit the configuration.
Service provider:Others
Host:exampledomain
User name:NA
Server address:duckdns.org/gnudip/
Protocol:GNUDip.http
WAN connection:nas_0_38
Domain:duckdns.org
Password:a7c4d0ad-114e-40ef-ba1d-d217904a50f2
Server port:80
Service name:DuckDNS
now check that your IP, has updated in our domains screen.
if this has not happened, then check you configuration (make sure you entered the correct host [your domain] and password [your token])

dd-wrt
these instructions are for dd-wrt routerson the web frontend of the router find the DDNS section in the Setup area.
You can or HTTP or HTTPS for the URL
DDNS Service:Custom
DYNSND Server:duckdns.org
Username:NA
Password:NA
Hostname:a7c4d0ad-114e-40ef-ba1d-d217904a50f2
URL:http://www.duckdns.org/update?domains=exampledomain&token=
Additional DDNS Options:--verbose 5
Do no use External IP Check:Yes
Force Update Interval:10
now click Save and Apply Settings and see the logs get produced

allied telesis
these instructions are for allied telesis AT-AR450Syou must change your token and domain to be the one you want to update
the AT-AR450S and some of the other models allow you to make plain http(s) requests.
use the following URL (the pattern https://duckdns.org/update/exampledomain/yourtoken)
you can add an additional ipaddress if you want to force a value (https://duckdns.org/update/exampledomain/yourtoken/ipaddress)
modify/create the file
pppupipc.scpadd these lines (to make the http request work for your domain)
del file=ddnsipup.txt
load method=http destination=flash destfile=ddnsipup.txt fi=update/exampledomain/a7c4d0ad-114e-40ef-ba1d-d217904a50f2  server=www.duckdns.org
then enable the trigger on the ppp up event
# TRIGGER Configuration
enable trigger
create trigger=1 interface=ppp1 event=up cp=ipcp script=pppupipc.scp
technicolor TG582n
these instructions are for the Technicolor TG582n other models may work with these instructionsuse telnet to connect to the router
telnet 192.168.1.1once logged in type the following commands and press enter after each line
dyndns
service
modify
name = custom
[server] = www.duckdns.org
[port] = www-http   (leave as default)
[request] = /update/exampledomain/a7c4d0ad-114e-40ef-ba1d-d217904a50f2
[updateinterval] = 10800  (in seconds - this 3 hours)
[retryinterval] = 30 (left as default)
[max_retry] = 3 (left as default)
saveall
now open the gui interface for the router in your web browser and go to the dyndns settings.
user: NA
password: anything as long as its not blank
service: custom
host: www.duckdns.org
the routers dyndns settings page looks like the one below

DynDns
we host a DynDns compatible endpoint https://help.dyn.com/remote-access-api/perform-update/any Client that can use this - should be-able to use this. e,g, inadyn
Note we support both the new v3 endpoint as well
you must change your token and domain to be the one you want to update
any client will be making requests with the following format (the IP is optional - if not present or empty it will be detected)
https://nouser:a7c4d0ad-114e-40ef-ba1d-d217904a50f2@www.duckdns.org/nic/update?hostname=exampledomain&myip=1.1.1.1&wildcard=NOCHG&mx=NOCHG&backmx=NOCHGv3 version
http://nouser:a7c4d0ad-114e-40ef-ba1d-d217904a50f2@www.duckdns.org/v3/update?hostname=exampledomain&myip=1.1.1.1the responses from this service are good, bad, nochg
inadyn
http://troglobit.com/inadyn.html have a small open source client that is in most Linux package reposthe client uses the dyndns endpoint
you must change your token and domain to be the one you want to update
terminal example
you can test the endpoint with the indyn command withinadyn --dyndns_server_name www.duckdns.org --username nouser --password a7c4d0ad-114e-40ef-ba1d-d217904a50f2 --update_period 60000 --alias exampledomain --verbose 5 --dyndns_server_url /nic/?
ubuntu example
this example is taken off someone setting up inadyn in Ubuntuinstall inadyn
sudo apt-get install inadyn curlcreate configuration file of inadyn (/etc/inadyn.conf)
sudo gedit /etc/inadyn.confand save this content
--dyndns_server_name www.duckdns.org
--username nouser
--password a7c4d0ad-114e-40ef-ba1d-d217904a50f2
--update_period 60000
--forced_update_period 320000
--alias exampledomain
--verbose 0
--dyndns_server_url /nic/?
--syslog
--background
add inadyn to crontab
export EDITOR=gedit && sudo crontab -eedit the file to add the following line
@reboot /usr/sbin/inadynreboot your PC
wait 3 minutes
check if inadyn is running
ps -A | grep inadyncheck inadyn behaviour
more /var/log/messages | grep INADYNcheck if your domain name resolves
nslookup exampledomain.duckdns.org
DNSOmatic
dnsomatic.com have DuckDNS as an option in their systems, they support a variety of software and hardwarehave a look at the wiki software and hardware
Windows C# - Visual Studio 2013
XWolfOverride has produced a C# updater https://github.com/XWolfOverride/DuckDNSlinux bsd cron
if your linux install is running a crontab, then you can use a cron job to keep updatedwe can see this with
ps -ef | grep cr[o]nif this returns nothing - then go and read up how to install cron for your distribution of linux.
also confirm that you have curl installed, test this by attempting to run curl
curlif this returns a command not found like error - then find out how to install curl for your distribution. otherwise lets get started and make a directory to put your files in, move into it and make our main script
mkdir duckdns
cd duckdns
vi duck.sh
now copy this text and put it into the file (in vi you hit the i key to insert, ESC then u to undo) you must change your token and domain to be the one you want to update
you can pass a comma separated (no spaces) list of domains
you can if you need to hard code an IP (best not to - leave it blank and we detect your remote ip)
hit ESC then use use arrow keys to move the cursor x deletes, i puts you back into insert mode
#!/bin/sh

DOMAINS="example"
TOKEN="feedface-dead-c0ed-babe-c0ffeec0de99"
curl_out=$( echo
url="https://www.duckdns.org/update?domains=exampledomain&token=a7c4d0ad-114e-40ef-ba1d-d217904a50f2"
| /usr/local/bin/curl --insecure --silent --config - )

if [  == "OK" ]; then
    logger -p daemon.info "duckdns update ok"
else
    logger -p daemon.err "duckdns update failed"
fi
now save the file (in vi hit ESC then :wq! then ENTER)this script will make a https request and log the output in the file duck.log
now make the duck.sh file executeable
chmod 700 duck.shnext we will be using the cron process to make the script get run every 5 minutes
crontab -ecopy this text and paste it at the bottom of the crontab
*/5 * * * * ~/duckdns/duck.sh >/dev/null 2>&1now save the file (CTRL+o then CTRL+x)
lets test the script
./duck.shthis should simply return to a prompt
we can also see if the last attempt was successful by checking the daemon status.
EdgeRouter
Instructions to setup on an EdgeRouter https://loganmarchione.com/2017/04/duckdns-on-edgerouter/smoothwall
smoothwall has WGET to use by default - this script is for basic smooothwall installsyou must change your token and domain to be the one you want to update
#!/bin/sh
wget --no-check-certificate -O - -o ./duck-mydns.log "https://www.duckdns.org/update?domains=exampledomain&token=a7c4d0ad-114e-40ef-ba1d-d217904a50f2&ip="
don't forget to change domains and token according to your configuration!
synology
these instructions are for the synology dsm 6.1 setupyou must change your token and domain to be the one you want to update
In the webpanel : go to control panel / external access /ddns tab
choose customize - add a new DDNS Provider
duckdns
http://www.duckdns.org/update?domains=__HOSTNAME__&token=__PASSWORD__&ip=__MYIP__
here is what the section looks like in the web interface (make sure you follow the steps above)

now complete the form with your details
Enable : CHECKED
Service Provide : duckdns
Hostname : exampledomain
Username/Email : none
Password/Key : a7c4d0ad-114e-40ef-ba1d-d217904a50f2

you should be able to see the udpater in the web GUI

linux netcat cron
this netcat version is for systems that do not have wget or curl availableTHIS VERSION IS OVER HTTP : USE THIS ONLY IF YOU HAVE NO WAY TO USE A SECURE METHOD
if your linux install is running a crontab, then you can use a cron job to keep updated
we can see this with
ps -ef | grep cr[o]nif this returns nothing - then go and read up how to install cron for your distribution of linux.
also confirm that you have curl installed, test this by attempting to run curl
curlif this returns a command not found like error - then find out how to install curl for your distribution. otherwise lets get started and make a directory to put your files in, move into it and make our main script
mkdir duckdns
cd duckdns
vi duck.sh
now copy this text and put it into the file (in vi you hit the i key to insert, ESC then u to undo) you must change your token and domain to be the one you want to update
you can pass a comma separated (no spaces) list of domains
you can if you need to hard code an IP (best not to - leave it blank and we detect your remote ip)
hit ESC then use use arrow keys to move the cursor x deletes, i puts you back into insert mode
#!/bin/sh
TOKEN='a7c4d0ad-114e-40ef-ba1d-d217904a50f2'
DOMAINS='exampledomain'
HOST="www.duckdns.org"
PORT="80"

# MAKE THE REQUEST PATTERN - remove the Verbose if you want to
URI=$(echo /update?domains=$DOMAINS\&token=$TOKEN\&ip=\&verbose=true)

# BUILD FULL HTTP REQUEST - note extra \ at the end to ignore editor and OS carraige returns
HTTP_QUERY="GET $URI HTTP/1.1\r\n\
Host: $HOST\r\n\
Accept: text/html\r\n\
Connection: close\r\n\
\r\n"

# OUTPUT TO SCREEN - Nice for Debug
echo "$HTTP_QUERY"
(printf "$HTTP_QUERY" && sleep 5) | nc $HOST $PORT
now save the file (in vi hit ESC then :wq! then ENTER)
this script will make a https request and log the output in the file duck.log
now make the duck.sh file executeable
chmod 700 duck.shnext we will be using the cron process to make the script get run every 5 minutes
crontab -ecopy this text and paste it at the bottom of the crontab
*/5 * * * * ~/duckdns/duck.sh >/dev/null 2>&1now save the file (CTRL+o then CTRL+x)
lets test the script
./duck.shthis should simply return to a prompt
we can also see if the last attempt was successful (OK or bad KO)
cat duck.logif it is KO check your Token and Domain are correct in the duck.sh script
what now?
Well you probably want to setup port forwarding on your router to make use of your new DDNS namewe recommend portforward.com to learn all about this.